I never met a chocolate I didn't like.

Sunday, January 30, 2011

Ice Cream without the Fuss

Ever wanted to make ice cream but don't have a machine and it all seems too hard?

I know for me it seemed a massive challenge - then I found this awesome recipe from the lovely Shannon (you have to love Facebook for having friends be able to post things like this) and it suddenly seems so much easier.

PERFECT for with our Chocolate Bark or just on it's own :)

No mess, no fuss, add whatever flavours you want - what could be simpler?


‎600mls Thickened cream
1 tin Sweetened condensed milk
Whatever flavouring you want to add (crushed honeycomb, mini m&m's, oreo biscuits etc etc)
 

Whip the cream to soft peaks, add half the tin of sweetened condensed milk, then add your flavorings. Taste. Add more SCM to taste. Pour into an old ice cream container. Freeze over night :)
 
You use an old 2l Ice Cream Container - fill to just below the top to allow for swelling during freezing.
 
You could add mixed berries for a 'healthier' option.
 
Thats it! Pure creamy bliss!

Friday, January 28, 2011

Countdown is on


Thank you for your patience.....only 8 days to go til product launch - teaser pictures will be appearing over the next few day :)


Tuesday, January 25, 2011

Choctacular Party

Every event can benefit from a little Chocolate right?

Looking for an easy Birthday Party idea that won't break your budget but at the same time be a hands on experience AND all the guests will have a take home gift that YOU haven't had to bag up/pack/pick out?

Introducting Sweet Science Choctacular Party


Sunday, January 23, 2011

Making Your Facebook Page Count

In this age of social media marketing - any steps you can take to make it easier for your clientele to interact can only be a good thing :)

Special thanks to Binkd for instructions on adding the 'Suggest to Friends' tab.

I haven't included screenshots but if you need them - shoot me an email and I can do a picture based tutorial for you :)

Welcome Tab
1.       Edit Page
2.       Apps
3.       If you haven’t already – add the Static FBML Application
4.       Go To App
5.       Change Box Title to <3 Welcome <3
6.       In the FBML Code box add
<center>
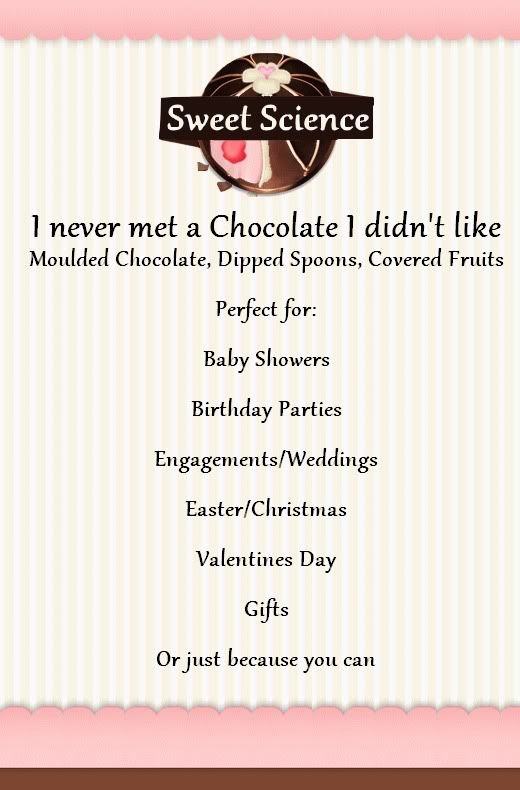
<img src="http://i35.photobucket.com/albums/d158/manfur_me/sweetsciencewelcometab.jpg">
</center>
Change the http://i35.photobucket.com/albums/d158/manfur_me/sweetsciencewelcometab.jpg to your image source code (this is the direct link from photobucket for my picture) – it must be no wider than 520pixels (mine is 520 x 700)
7.       Save Changes
To ensure this is the default tab that new likers land on
1.       Edit Page
2.       Manage Permissions
3.       Default Landing Tab – choose your welcome tab from the dropdown menu
4.       Save Changes

Contact Tab
This uses a form from jotform.com – you will need to go to their website and create your own form (or i can do it for you if you want)
1.       Create form at www.jotform.com
2.       Edit page
3.       Apps
4.       Scroll til you find your welcome tab FBML app (it will be called <3 Welcome <3 – FBML or similar depending what you call your welcome page)
5.       Go to App
6.       Scroll down under the save changes option – you will see a blue worded line ‘Add Another FBML box’ – click
7.       Click on ‘edit’ next to your page name
8.       Apps
9.       Scroll til you see the new FBML box
10.   Change the name as per welcome tab (ie to something like Contact Us)
11.   Enter the following code:
<center>
<img src="http://i35.photobucket.com/albums/d158/manfur_me/contacttab-1.jpg">
Change the img src code to the direct link for  your header – again make it 520px wide (mine is 520 x 300)

12.   In Jotform – once you have completed your form click on ‘Source Code’ from the ‘Set Up and Share’ Tab
13.   Click advanced options
14.   Chose social network
15.   Then facebook
16.   Copy and paste the code
17.   Paste this line of code under the image code you entered
18.   Type </center> at the end
19.   Voila – a contact tab is made J
Adding ‘Refer to your friends’

super easy tutorial J

then you just drag the tabs around on your page to create the order you want – you can add as many FBML pages as you want – you just do the same thing each time
edit page
apps
find the last FBML you created
go to app
add another fbml box
edit
apps
find new box
go to app
enter html code

It should be noted there are many talented WAHP's on Facebook who can custom design your contact tab etc for you (most are a nominal fee of around the $10 - $20 mark) but you can design it yourself in photoshop/photo filtre, upload to your photo sharing server and use the link details listed above - the option is entirely yours :)

Saturday, January 22, 2011

Easy Peasy Chocolate Cake

Now I like to cook but loathe dishes (doesn't everyone) - that's why I LOVE this cake - one saucepan, one tin, 2 beaters and a scraper - seriously how can you not love this?

You can vary this to suit your dietary needs:

For Diabetics - subsitute the sugar for your sweetener substitute (splenda/equal/etc) and use wholemeal flour
For Gluten Free - now I'm not 100% on this as I personally haven't tried it but you could substitute for GF Flour and apparently Saco make a GF Baking Cocoa Powder - I imagine that would be incredibly hard to source though.

As always - as the oven is involved please monitor little people when you are doing this :)

INGREDIENTS
(these quantities yield a 'lamington tray' - the large rectangle tins, halving will yield a standard square tin, quartering yields a standard loaf tin)

2 Cups Water
1/2 Cup Butter
3 Cups Granulated White Sugar (or Sugar Substitute)
4 Heaped Tablespoon Cocoa
3 Cups SR Flour (or GF SR Flour/Wholemeal SR Flour)
4 Eggs

1. Preheat oven to 180 deg (160 fan force) and grease/line your correct size tin (you can also make these into cupcakes)
2. In a saucepan combine water/sugar/cubed butter
3. Stir til combined and over medium heat stir until butter disolved, ensuring you wipe down the sides of the saucepan with your wooden spoon
4. Increase heat and bring to a boil - once boiling remove from heat and cool
5. Once cool add eggs and SR Flour - beat until well combined
6. Pour into tin and bake until skewer comes out clean (depending on size of cake/oven approx 30-45mins).

Once cool ice in your preferred method - if you make them into cupcakes - dip top into melted chocolate, cover in sprinkles and you will have mini-freckle cakes :)

This cake will also freeze - simply cool, wrap in glad wrap (or in the cupcake case place into zip loc bags) and freeze for upto 3mths uniced - when required thaw until soft and ice as normal - though if you can get any into the freezer I'll be impressed :)
Told you it was easy :)


Friday, January 21, 2011

Old Fashioned StickJaw Toffee

I made a discovery yesterday - if you have run out of patty pans OR if you are like me and loathe having to remove the paper from the outside of your stickjaw toffee's you can use Silicone Cupcake Pans.

You will still need to place them inside a patty cake tin to allow for shaping but otherwise you simply make, set and then remove the silicone case when you want to eat :)

WARNING - SUGAR SYRUP CAN BE DANGEROUS - PLEASE DO NOT HAVE LITTLE PPL ASSIST WITH THIS AND MAKE SURE YOU KEEP YOUR FINGERS OUT OF THE WAY

Makes approx 12-20 (depending on size of pans you are using)

INGREDIENTS

3 cups sugar
250ml (1 cup) water
60ml (¼ cup) brown vinegar
liquid food colouring (optional)

METHOD


1. Place sugar, water and vinegar into saucepan, stir over low heat until sugar has dissolved; brush down sides of saucepan with brush dipped in hot water to remove any sugar from sides of pan.

2. Increase heat, boil rapidly uncovered for approximately 15 minutes or until a small amount, when dropped into cold water, will "crack." This gives a good, hard toffee. (If you prefer the "stick-jaw" or more stretchy toffee, boil for 10 to 12 minutes only or until a small amount, when dropped into cold water, forms a soft ball between the fingers.) Remove pan from heat while testing.

3. When toffee is ready, sitr in any food colouring you wish to add, remove from heat, stand saucepan in cold water 1 minute. Remove pan from water, and allow all the bubbles to subside.

4. For easier handling pour toffee into heatproof jug. Then, pour into paper patty cases/silicone cases. (To keep good shape while toffees set, stand the cases in patty cake tins) Leave 2 minutes before decorating with coconut or hundreds-and-thousands.
5. When set - simply unpeel your paper cases/silicone cases and enjoy :)
Now the hardest part of all of this - waiting for them to set - if you get REALLY impatient you can set them in the freezer - I *may* have been known to do this in the past :)